
Protecting Your House from Flood Water
In the hope of helping others to prevent damage to their property, this article tells how I successfully protected the inside of my house from flooding, despite the water rising up about a meter and staying at that level for weeks. My methods held up against the water over the entire period, and I came back to a house without any damages except needing a quick outside cleaning.
When I returned home to my house on December 3, I was very surprised to find out that my house was the only one on the block which did not flood at all inside, and that it had been the talk of the neighborhood with countless visitors coming in who my neighbors had never seen before, so I thought perhaps I should publicize my rather unconventional methods.
These home preparations don't take much time or expense. In fact, I did these preparations all in one evening. During the week, I live in an apartment in the city and I come home only for the weekends, usually. My wife and I rushed out to the house one evening to see what we could do to protect it. I think others can improve upon the methods below.
Sorry, we didn't take many photos at the time, but I do have some photos below. Now I wish I'd taken more photos, as I hadn't planned on writing this article at the time.
First, a short summary of the situation we encountered in 2011.
The Great Flood of 2011 in Bangkok, Thailand
The Great Flood of 2011 in Bangkok, Thailand, resulted in immense damage to factories, shops, houses, and many other things in its wake. Bangkok has basically been a flood plain for millenia at the end of the rainy season, located at the mouth of the Chao Phraya River, the largest waterway in Thailand which drains a vast network of tributaries reaching far upcountry. In 2011, the greatest floods in more than 50 years (since 1942?) came due to greater than usual rains in Thailand, overwhelming Bangkok's canal network, sluice gates, and pumping stations, after inundating places along the river upcountry.
We had about a week's warning of an incoming deluge of water due to massive flooding of other cities and countryside upstream along the river, and we saw the river and canals rising.
I live in Pathum Thani, a northern suburb of Bangkok. The large Rangsit Canal is located just a couple of kilometers from my house. The Army lined this canal with sandbags to buy some time, but we all knew that the canal would eventually spill over that raised level, too.
My neighborhood was buzzing with activity as trucks came around selling sandbags, some residents were building new cement walls at the front of their houses, and people were helping each other move things upstairs. Neighbors were chatting on the street exchanging tips and news. There would be shots fired in the air to warn the residents when the water started to overflow the sandbag levee.
I had two relatives who agreed to stay at the house and watch it. I would leave the house for more than a month, sad and worried.
Preparing My House
Looking at what everybody else was doing, I was not convinced those were the best ways.
By far the most popular defense was sand bags in front of doors. However, sand bags leak around the edges. Putting up a cement wall did not seem necessary to me, either.
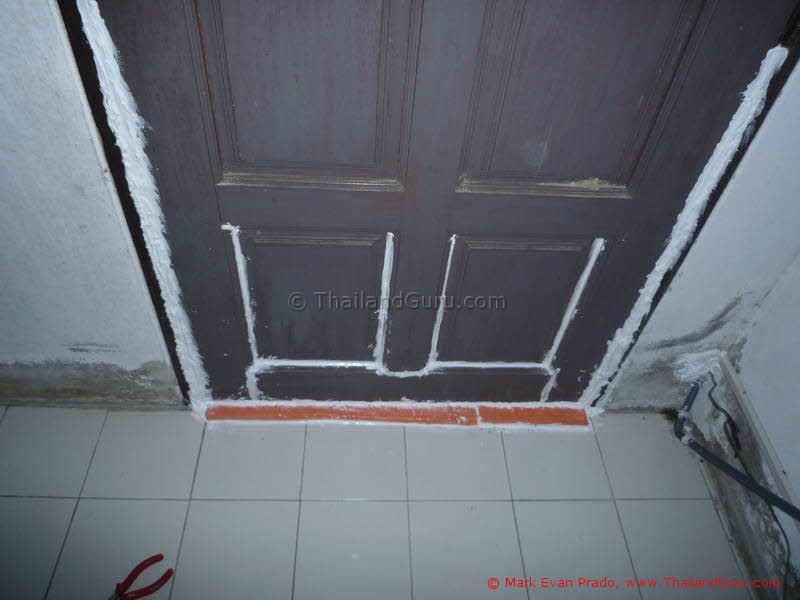
I talked it over with my wife, Na, and we decided to go buy some silicone to seal around the door plus any cracks and holes we could find.
Silicone is a soft rubbery sealant used for aquariums and windows. After the flood was over, we could just get a knife to cut it, open the door, then scrape it away.
As the door had some sizeable gaps, there was some concern over the adhesive and structural integrity of a thick slab of silicone at the bottom of a meter of water pressure, so we cut some plastic poster board to fill in the gaps. Actually, we came out putting silicone into the gaps before sliding in the poster board, and then applying extra silicone on the outside, then spreading it out to form the best seal.
Analyzing in detail how the door had been manufactured, we saw that it was assembled from many pieces and there were very tiny gaps where the door was not water tight. We went ahead and sealed those with silicone, but putting a piece of plastic such as a cut trash bag would probably have been sufficient without the silicone.
Actually, I didn't have complete confidence in being able to make the door watertight, and some people may have misgivings about having tried to seal up the tiny gaps since we'd have to remove that silicone later, so I had a better idea ...
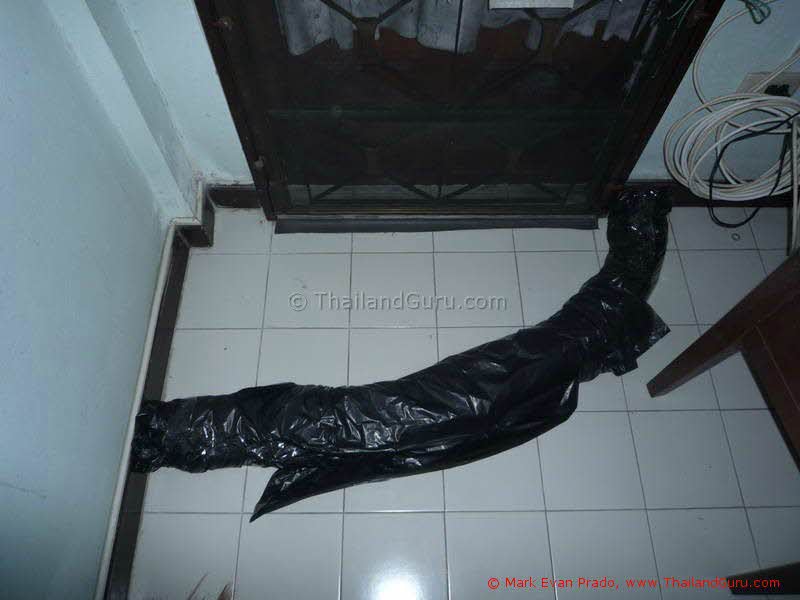
For tiny cracks, you can put a plastic trash bag in front of the door, sealed with duct tape. The water outside will push the bag against the door, sealing the tiny cracks. Depending upon the success of the duct tape in not leaking, this could also keep the door dry or less wet, so it doesn't soak up water and expand. (Nevertheless, silicone around the perimeter of the door is still important.) So I put on two layers of plastic. Here is layer #1:
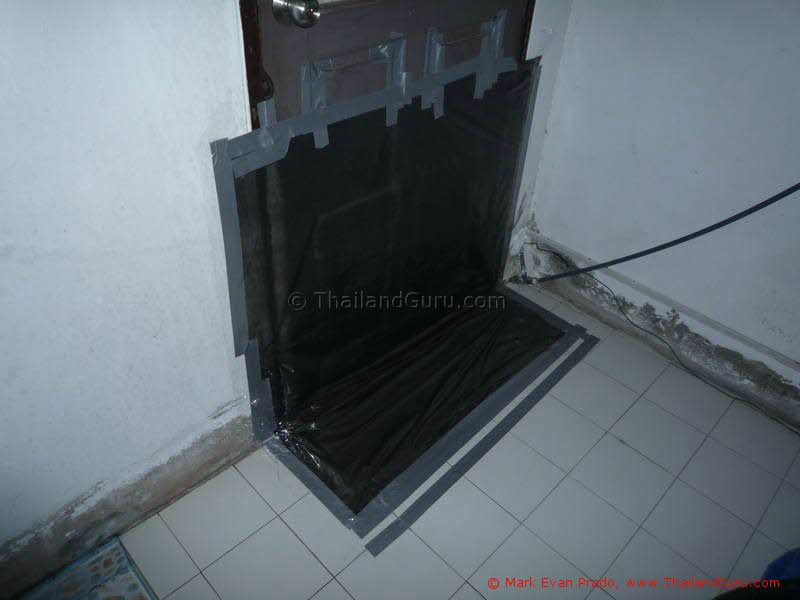
I put a second, wider layer on top of the first (no picture of that, sorry).
A neighbor simply taped the perimeter of their door with duct tape, nothing else. However, I heard their house flooded. Maybe the water came in thru the door, or maybe the duct tape wasn't a good enough seal, or maybe water came in elsewhere such as the drains or walls with neighbors. I don't know.
We also covered the door hinges, liberally (again, silicone will come off easily later). We sealed all the way up to near the door handle. As the door handle was near the bottom of the window, we decided this would be the end of a stage 1 flood protection effort. The house would be protected only to window level, because the window had become the door, and I didn't want to seal that off because then people would be trapped inside the house or need to rope down from the second floor.
Window Grill
We had an anti-burglar grill on our window which had to be removed so that we had a way to get in and out of the house. Removing this grill was the only difficult part of the job. The screws were old and rusty, easy to strip, and difficult to line up a screwdriver for. An L-shaped screwdriver was needed, which I didn't have. The screws were very tight and the wood hard. What I came out doing was loosening the screws by sheer muscle force of jiggling the grill, starting with a corner, using anything for leverage, until I could loosen the wood around the screws just enough to be able to turn the screws without stripping them. Be careful not to cut yourself around rusty metal due to tetanus and other potential infections. Handle some things with thick gloves or handy rags.
Once the window becomes the door, you need to set up some stable steps which people will not fall from.
Drains
Water will come up out of the drains, and it will be the worst kind of water -- sewage. Thailand uses septic tanks underneath houses, not any piped central waste processing plant (which would be another topic...), so that everything you flush down the toilet stays underneath your house. Bacteria decompose it before it can go far.
There is also a pipe network in your neighborhood, so that sewage from neighbors can also come up.
As the water rises outside, it also pours into the sewage system. In fact, if your neighborhood is sandbagged along the perimeter, the water will just come up from the street sewers. It will also go from the street sewers into the personal sewers. Your downstairs shower will start to drain slowly as well as your toilet, until the flood water reaches floor level and then they fail altogether.
When the water outside your door is higher than floor level, water will start to come up out of your drains, too.
You must seal your drains. Here is how I did it.
The general concept is to put a thick rubber pad on top of all drains, and then a heavy item on top of the pad. However, it must be done right.
I went to Tesco Lotus and just got the thickest rubber (not plastic, but rubber) poster board. Then I cut pieces which were a few centimeters larger than the drain holes.
I also found a flat and hard object, and some heavy things to put on top of that.
I dried the floor thoroughly and put silicone on the floor around the drain in a continuous circle about a centimeter wide. (NOT in the drain, only around the drain. No need to screw up your drain!)
Then I put a small slab of granite slightly larger than the rubber pad on top of the pad.
Then I put a wide slab of granite on that, centered for balance.
Then I stacked up heavy stuff on that wide piece of granite.
I was fortunate that a neighbor sells granite slabs and had a lot of broken and less aesthetically desirable pieces on hand. However, any hard and flat object can go on top of your rubber pad, and then you stack weights on top of that.
If you expect 1 meter of water, then you need weights on top of your rubber pad which will be heavier than a 1 meter column of water as wide as your drain. This is enough to counter the drain pressure. However, put as much weight on as you can.
For the toilet, it may be best to put something inside the toilet such as a well sealed sand bag and then weight on top of that. However, I had so many granite slabs that I just lined the top of the bowl with silicone (after cleaning and drying the top of the bowl) and put a BIG rubber posterboard pad on top of the bowl and a big stack of granite on top of that.
Here are the kinds of materials I had at hand:
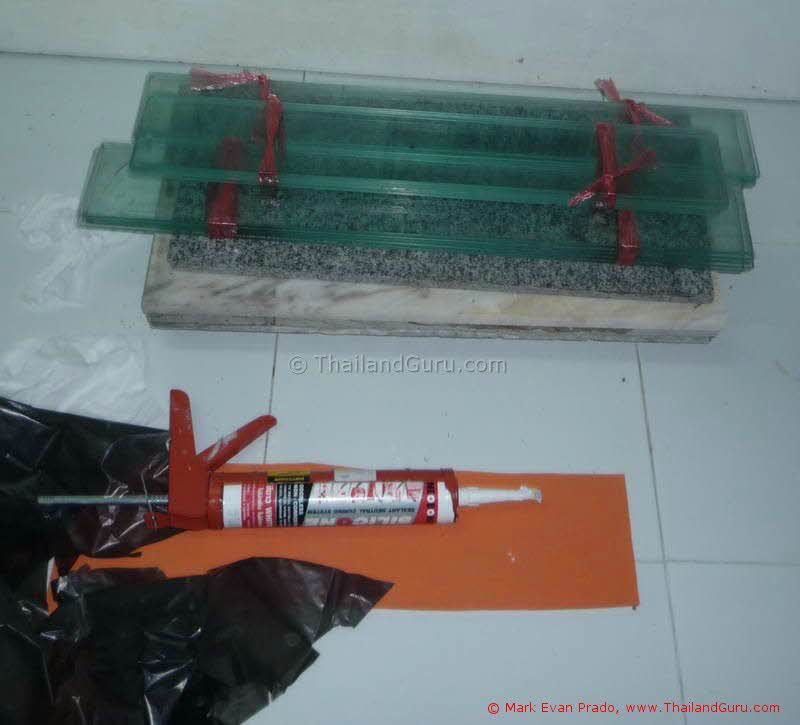
The orange is poster board about half a centimeter thick. I would have preferred maybe a centimeter thick, but this was sufficient, and I just cut and stacked a few layers to make it a bit over a centimeter thick. The rubber seemed of sufficient quality and stability.
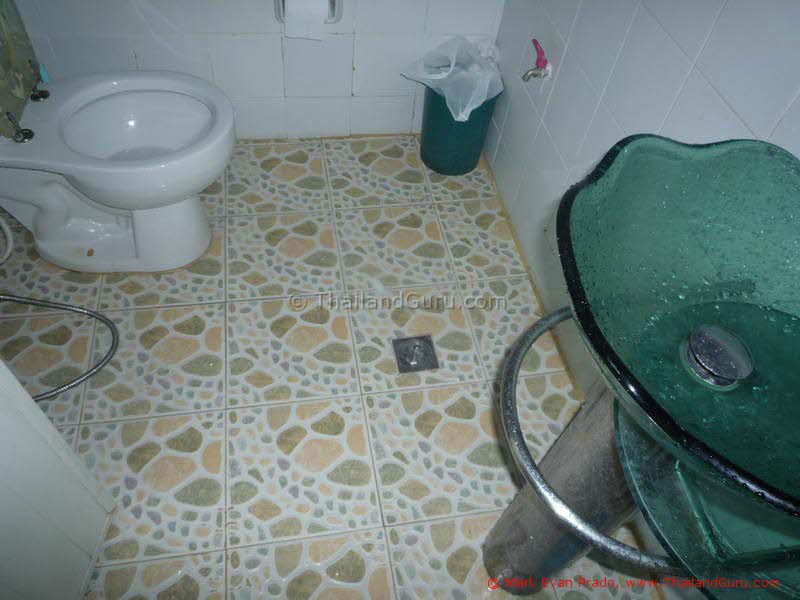
The drain in the center below must be covered. The toilet is also fairly low. The sink, never mind, because if the water rises high enough to come out of the sinks, then it's high enough to come in the windows and a lot of other sinks.
In the photo below, I am plugging a drain in my kitchen, underneath the counter. You can barely see the edge of the orange pad (the silicone is not visible since it is under the pad around the drain hole), with a small square of granite on top of the orange pad, and then a wide slab of granite to hold weights on top of that. In this case, I stacked up some spare slabs of glass on top. The weight on top has a huge safety margin but I wanted to make sure to prevent trickles. (You can use anything for weights, but preferably things of higher density than water, and you don't need to make it so high if you have a wider slab to stack it onto.)
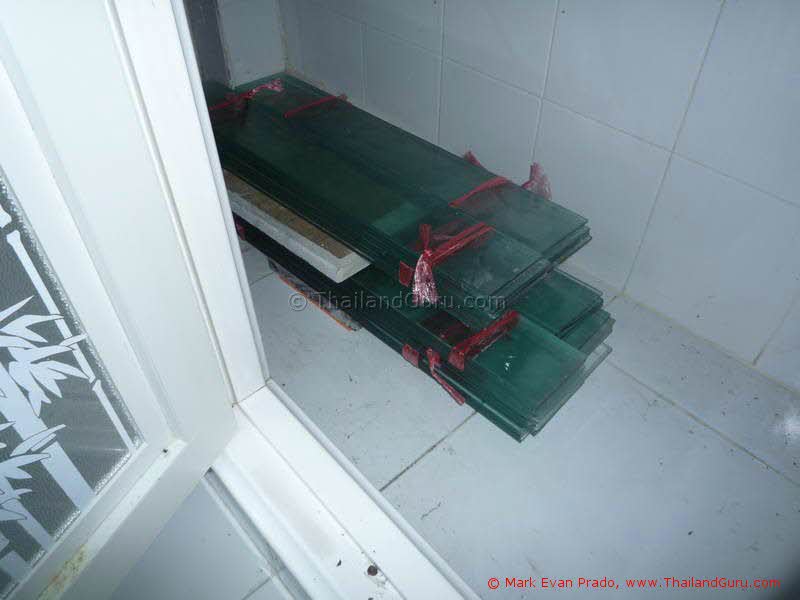
I don't have any photos of the bathroom sealed up, only the one above of the drain in my kitchen.
Actually, in plugging the bathroom drain, I improved a little bit upon the design by also wrapping my rubber pad in a plastic bag before setting it on top of the drain, because I didn't want the drain water to permeate the rubber. That proved unnecessary in this case.
At the start, you need to think about the height of flood that you want to protect yourself against, and seal everything to that height. I chose the sink & window level, for various reasons. First of all, we did not expect the water to rise quite that high in our neighborhood. Secondly, the amount of preparation and work goes up as you hit the level of sinks, toilet basins, and windows. Thirdly, the hydrostatic pressure on lower lying seals goes up as the water rises, threatening to spring leaks. If you want to protect to high levels, I suggest considering sealing off the kitchen and bathroom doors in case there is a failure somewhere, and employing your pump with a hose to empty the leaking water.
Walls
My house is a townhouse. The power outlets are low on the wall. If you open one, you can see that there is an open air link to the neighbor's unit. If the neighbor's house floods, then water will come in via this outlet.
They are also an electrical hazard during a flood.
I traced the electric wires and cut them high up. Then I double checked with an LED electricity detection screwdriver as well as a voltmeter. Then I stuffed the gap with a sealed plastic bag with just the right amount of sand in it, and screwed the cover plate on top to hold the sand baggie tight against the hole. It must be able to stand the hydrostatic pressure of the water.
This was my #2 worry during the flood, that maybe I hadn't done my best to seal this, but it held up without any leakage at all. Both neighbors' houses flooded, but none came in thru my power outlets. I later found out that some people had their homes flooded only via the power outlets with the neighbors.
We had also drilled some holes for electrical wires to go from the inside to the outside of the house, so we had to seal those up, too.
The rest of the perimeter was reviewed for anything to seal up. However, silicone works well only when applied from the outside, not the inside. The water's hydrostatic pressure must push the silicone on the outside into the gap, not push it out of the gap into the inside of the house.
If there is any slow leak along the walls, then just put a little bit of sand into a trash bag and roll it up to contain the water. Every few hours, soak it up with a towel. For example, I did this around the door (though it proved unnecessary at that particular location, this illustrates the concept).
We kept some sandbags inside the house just in case there was a failure somewhere, which we could isolate and then scoop out the water by the bucketful. However, that never happened.
We also kept sand bags handy in case the seals around the bottom of the toilet along the floor failed under all that hydrostatic pressure. This was the #1 worry for me. (They held, did not fail.) If the seals had failed, then we would have blocked the bathroom door with big sand bags stacked high enough. That's when the pump and a hose would have been handy. Sewage is the worst thing.
Again, we did not need to use any sandbags whatsoever this year.
Water Pump
We have a water pump, to add water pressure to the second floor, and a water tank just in case city water fails for a day. This is common in suburban Thailand, especially in houses built before the year 2000 like ours. This pump can be useful for a second purpose: pumping water out of the house.
Whether or not you use your pump for the second purpose, you still need to disconnect it and take it inside your house to protect the pump from getting wet from the flood.
We could have used that pump to pump out water which enters the house. However, for two reasons I decided not to. First, I didn't have the proper adapters to connect a hose, and would have had to go back to the hardware store the next day to get adapters (and hose) but I had business to do, and was wary of bringing my car out to a flood zone again. Bad excuse, admittedly. Secondly, I didn't want to risk anybody getting electrocuted trying to operate that electric pump. I had already cleared out all downstairs electrical vulnerabilities as best I could. If there is enough water in the house to justify using a pump, then I needed time to make the pump safe -- grounded in its location inside the house and connected to a good RCCB breaker. Protecting property is not as important as protecting life, so since I didn't make the time to do it right then I'd just stowed away the pump upstairs.
Nevertheless, a pump can be very useful in a flood, especially a deep one when seals start to leak due to higher hydrostatic pressure. Those kinds of leaks are usually slow, and a typical house water pump can pump water out at a high enough rate parttime (on and off) to keep a house from flooding.
If you employ a pump during a flood, then take these steps:
- Ground/Earth the pump -- properly! (See my section on grounding / earthing.)
- Elevated the pump a little bit, maybe a few centimeters, so it never gets wet.
- Connect it to a good electrical breaker just for extra safety, such as an RCCB breaker.
Next time, I will probably do this.
However, if the electricity goes out, so does your ability to pump water. The power company sometimes cuts power to flooded areas in order to prevent electrocutions. A solution to this is to buy a generator which runs off of gasoline or diesel. This is a significant step up in flood preparations, due to the cost of the generator, the need to keep fuel stored in the house, and of course there is exhaust from the engine.
Ideally, it would be nice to have some solar photovoltaic panels on the roof and the electronic equipment necessary to make it run a pump during the day, as well as charge mobile phones, run cooling fans, and help with other electrical needs, just in case the power is cut by the power company.
Electricity
I made sure there were no wires or electrical items which could fall onto a wet floor. A large percentage of the deaths during the flood were due to electrocutions.
The power company did not cut power to our house, thank goodness.
Move Valuable Things Upstairs
This is obvious. For example, our refrigerator was moved from the kitchen to the upstairs office.
Stock Up
The shelves of every store ran out of water long before the flood came, which was a combination or people stocking up for the future and delivery trucks unable to deliver due to flooded roads somewhere in the supply chain.
The shelves also ran out of favorite foods. Stock up on foods which will last ...
Also, batteries and a flashlight.
We had a UPS for charging the mobile phones in case the electricity was cut.
We also sealed the drain of the upstairs bathtub with a trash bag and duct tape on top of the rubber seal (actually, two layers of plastic bag and duct tape). You know, bath tub stops usually are not so water tight, and leak over days. We kept the bath tub full of water in case the city water supply failed. Thais often keep a big trash can full of water in the bathroom anyway, so actually I would recommend buying a few of those and filling them up with water in advance.
When The Flood Came
When the water overflowed the canal into our neighborhood, it rose very fast.
The army evacuated the neighborhood with its big trucks. Only 3 houses on our soi of about 30 houses had occupants stay to defend their houses.
My inlaws said it was very quiet, and dark at night. Nothing but water outside, like living in a lake.
There was reportedly a thief on the adjacent soi but not on ours.
One neighbor had a boat and would stop by periodically to say hi and see if everything was OK.
The inlaws didn't dare go out, as the water smelled a bit of sewage.
You live off what you stock inside the house.
In retrospect, it would have been good to buy a flat bottom boat well in advance, preferably during the offseason. Prices go up during flood times.
Results
Only tiny amounts of water trickled in, via walls with flooded neighbors, in just a few little places, apparently just tiny cracks in the cement. The flow was slow enough that it just required a quick towel wipe a few times per day. There seemed no feasible way to predict these. It was just a tiny bit of water creeping in here and there in a few odd places.
This year, we survived with flooding of approximately 1 meter of hydrostatic pressure which stood for a few weeks. Next year, I will have the pump handy, too.
Electricity never went out. Also, internet didn't go down, amazingly, which was MOST important to the inlaws! Who cares about the water outside, the internet is the window to the world!!
Returning Home
Sandbags still lined the canal as before which was still high but no longer overflowing, and the neighborhood entrance had a big pump connected to the underground sewage network of the neighborhood, still pumping water out.
Driving inside the neighborhood was surreal, returning to a disaster area. The roads were lined with stacks of water damaged furniture, appliances, and trash. Some army men were helping others to load stuff into big trucks. Activity fixing up houses was all around.
If the house does flood, you must clean and dry it out immediately so that you minimize mold and bacterial damage. It appeared everybody was diligent at that. Many houses looked nice already, including repainted ones. Signs were around offering professional services to help out.
The neighbors were friendly and sociable, helping out each other.
Most amazing of all, I bet everything will look fairly normal in about a week, albeit at great financial cost. There's not much else to do for many of us, given the drop-off in business.
Below: The Rangsit-Nakhon Nayok highway, normally 3 lanes of traffic, but the far right lane has been stacked with trash. Note: This is not trash washed up, this is trash driven out and dumped.
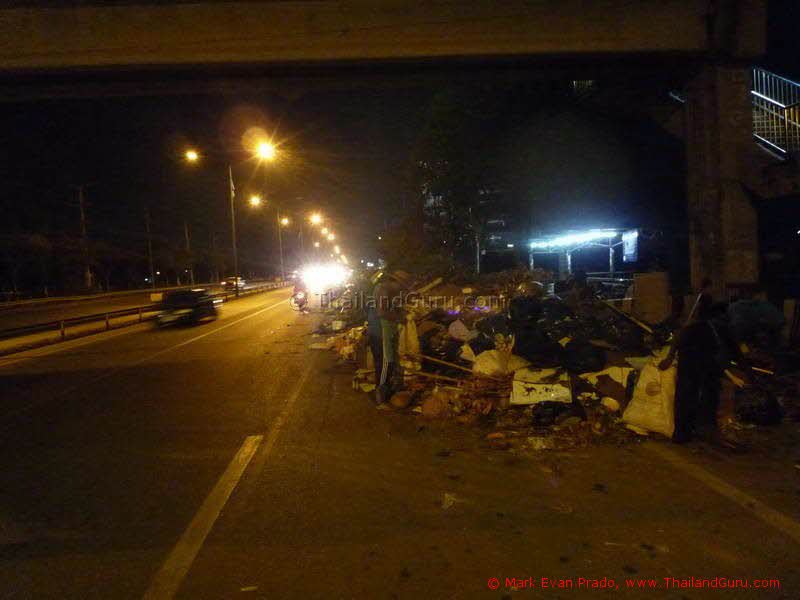
The pickup truck on the right is dumping its own trash onto the heap:

There were low income people scavenging the trash for things which could be used or resold.
On some segments of the road, there were lines of air conditioner compressors, clothes washing machines, and other items which had gone underwater and which the owners had discarded. With cheap labor, many of those things could be disassembled, cleaned up, dried out, and recovered as usable.
Commentary
There were many cars flooded. In the west, as well as in Thailand, it's often an insurance write-off ... unless the insurance rules out natural disasters or "acts of God" or with other language to exempt the insurance company of liability for a flood.
However, with economical labor in Thailand, these vehicles can be repaired.
You should not attempt to start a car after it has been flooded. It must be disassembled, cleaned out, dried up, and lubricants replaced. The electronics are the main issue, and I wonder if there is any anticorrosion spray or somesuch which could help.
I heard that local shops were doing the job, including replacing the interiors, for around 100,000 baht (US $ 3300).
With so many unemployed from flooded car factories, this could make a good interim job, since they're familiar with car assembly, and there's surely a shortage of car mechanics for flood repairs at this time.
I would also like to comment on the location of the flooded industrial estates in Ayuthaya province. I worked at some in the 1995-97, setting up software (engineering related and project management). There had been warnings by the King and the Irrigation Department that the locations of the industrial estates were on flood plains and therefore vulnerable to flooding, but the industrial estates were built anyway and companies flocked to them. I remember this being discussed by incoming companies, but engineers assured them (like salesmen) that they had protective measures, with overconfident reassurances.
We saw the results of that in 2011.
Too many factories left too much of the flood prevention to the outside estate managers, without building their own second stage defenses, and without questioning and analyzing the estate's claims of safety.
I've known some good and some not so good project managers. The not so good ones take the simple and lazy path of plugging in specialists and leaving the responsibility to them and then forgetting that task done and moving on. The best project managers have experience, an attention to detail, are good judges of character, have good experience and contacts, and know how to get competent scientific analysts who are independent, incisive, and don't give in to social pressure and to double check, critique, and question in detail the systems built and in place. Often, this requires an expat for quality assurance. This is a tiny fraction of the work -- just inspecting what has been designed, and what has actually been built.
Sometimes, the conceptual design itself is lacking. We see design flaws in products often in the world. How did they get thru the approval process and actually built? How many people in the process must have seen that and just said nothing because it's not their responsibility?
Often, there is a significant difference between "as designed" and "as built". For example, I encountered one of the first instances of this in 1995 when an office building had recently been completed and companies moved in. There were complaints that some areas were too cold and other areas warm. The engineer who designed it kept poring over the design and admitted he didn't understand why. We discussed it, and eventually decided he should go over to the building and have a look. It turned out that "as built" was very different from "as designed", yet people had signed off on it. That was the problem.
It's not the first time we've heard reassurances from professional engineers, only to see problems on further inspection ourselves (see also my page on electrical grounding -- I helped fix factories and bank computer systems in this regard, too).
There were also problems with cronies getting awarded contracts based on contacts, bribes, kickbacks, and other non-merit reasons, then cutting costs to maximize profits. Plus, businessmen often don't understand engineering issues, and one engineer looks as good as another to them.
I can go on and on about my experience in observing these systems, and selfish carelessness about the Greater Good is a pet peeve of mine ... but I will spare you that here, and go on to another issue:
It's better to locate a factory along the eastern seaboard or one of the other locations scattered around which is NOT in a flood plain of the Chao Phraya River (whose name means the great river in the Thai language). There are very good industrial estates in Thailand outside of the flood zones. (I also worked at some on the eastern seaboard in the 1990s.)
Not only is your factory at risk, but even if you build a successful perimeter defense, seal the sewage sources (for starters, does any estate have a sewer sluice gate?), and put in excellent sump pumps ... your factory still must deal with the transportation issues -- with roads flooded, how do you get supplies in, products out, and employees in and out during the flooding period?
If you can't afford loss of productivity, then set up your factory in another of the good industrial estates in Thailand which are not prone to flooding.
However, if you want an economical house on economical land now, they buy in one of the flooded areas of 2011, perhaps follow and/or improve upon the methods discussed here to protect your home during the flooding season, build a ramp for your car over a few square meters of your land, and buy a little motorboat to stow on a shelf in your garage, too.
Foreigners cannot own land in Thailand (generally), though their Thai wives can. Indeed, owning a unit in a highrise condominium assures that at least your unit will stay dry.
If you do employ the above techniques, then be careful not to cut yourself because bacteria, tetanus, and other bad things are potential threats in rusty screws, flood waters, areas you usually don't go. Wear gloves or use handy rags when necessary, and think thru things before you actually do them.
If you must walk in deep water, you should be careful because you cannot see where you are going and could step on something, or scrape your leg against something, or step into a hole. Surrounded by dirty water, this can be dangerous.
One way to keep your legs dry, if the water isn't too high, is to put each leg into a large black trash bag. Just fold up two bags and take them with you, similar to wearable rain coats, but with some big rubber bands to hold the trash bags up. This way, the only thing to get wet is your shoes.
If you have any tips, please send them to me so I can put them up here.
 > Miscellaneous Tips > Flood protection
Copyright 1999 -
2026 by Mark Evan Prado, All Rights Reserved.
Notably, I get quickly notified of copies of tracts by the CopyScape / CopySentry automatic search engine & notifier.
Short quotes are often OK and can be approved, if there is a clear reference and web link back to my website from the quoted material, and if you send me a short message. I try to help people with good intentions, and try to help the world. Not thieves. Links back to this website are helpful for sustainable progress, thank you!
Please have honor and class by following intellectual property and internet protocols. Be a good kind of person in life.
|
Want to privately ask the Thailand Guru? Contact us.
|
|
Some of the services discussed on Thailand Guru are provided by our friendly staff in our 2 companies: |
|
|
Lucky Lion Pride Co., Ltd.
|
|
| DISCLAIMER: Although efforts have been made to ensure the information on this website was correct at the time of electronic publication, ThailandGuru and all its associates do not assume and hereby disclaim any liability to any party for any loss or damage caused by errors, omissions or misleading information resulting from negligence, accident or any other cause. If you choose to take any of this advice, it is at your own risk and no other entity's. ThailandGuru and its associates will take no responsibility. The only thing we guarantee is that our website information can take bandwidth, memory and/or disk space, at least temporarily. Guru is relative. | |
Menu: Site Map